A bootable USB drive or USB key (as some people like to call it) is an easy and convenient way to install an operating system (Windows, for example) on a computer system. You may especially need one in case you’ve a netbook that has no CD/DVD ROM.
Generally, we make use of various software utilities for creating a bootable USB-Drive. Here, here we will demonstrate how to use command prompt method to create a bootable USB Drive. It’s equally simple and easy.
Once you’re done creating a bootable USB drive,
- You can use it to boot into the Windows Operating System.
- A bootable USB-flash drive can also provide you the flexibility to perform diagnostics on a computer system that has hardware issues and cannot therefore boot successfully.
- You can also use this bootable USB drive to install any Operating System, without the need of CD/DVD-ROM on the computer.
This short, step-by-step guide will outline all the required steps necessary to make a USB-flash drive bootable using command prompt. But before we get started, make sure that the computer system in which you want to use your bootable pen drive is capable of booting to a USB drive.
Follow these steps to make USB drive bootable by command prompt
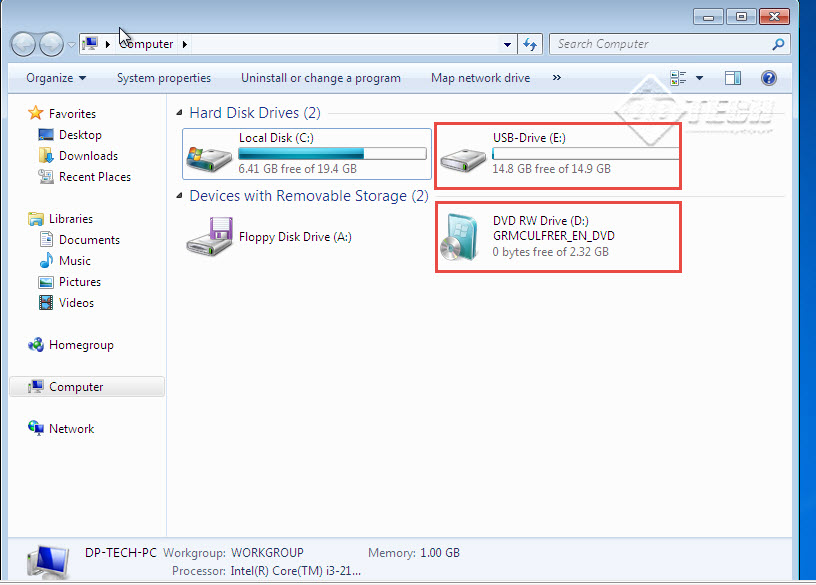
Step 1: To begin with the process, you are required to purchase need a USB-Flash Drive (it is recommended that you have a USB Drive of at least 4 GB in size to store all the necessary files) and one CD/DVD of the Operating System. (Check the screenshot below)
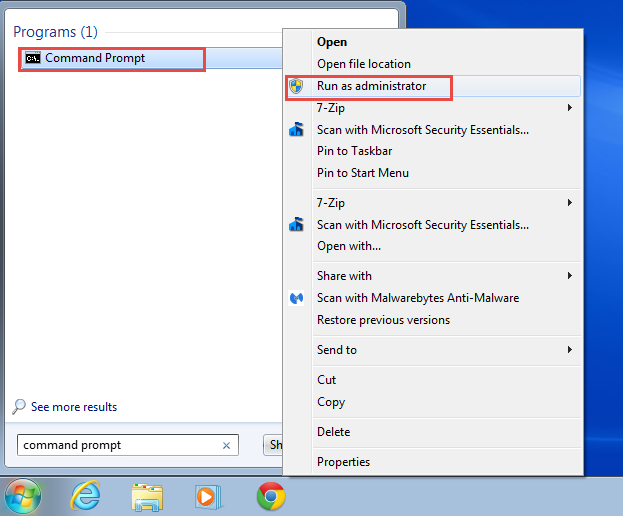
Step 2: Go to the Start Menu and scroll up to “Command Prompt” tab. Right click on the option “Command Prompt” and click on “Run as Administrator”. (Check the screenshot below)
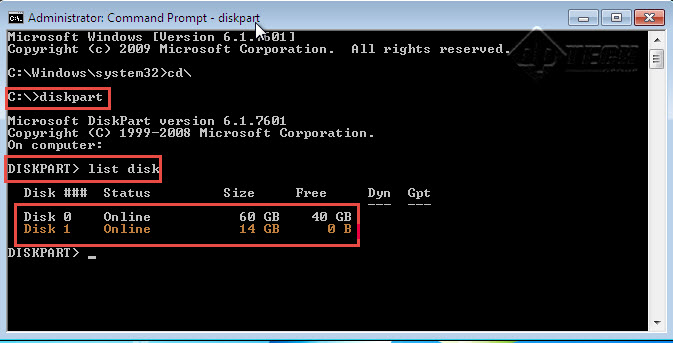
Step 3: Now, to check the version of Microsoft Windows Operating System installed on your system, type in “diskpart” on the command prompt screen and hit “Enter.”
Step 4(a): Upon execution of the command, the command window will display the version of Microsoft Windows OS. Type the command “list disk” to check the status of disk available. (Check the screenshot below)
Note: Disk 1, as shown in the screenshot below is USB-Flash Drive. In case there are multiple drives, you can identify the target USB drive from its size displayed on the screen. Take note of the disk number of the USB drive. It may not always be “Disk 1.”
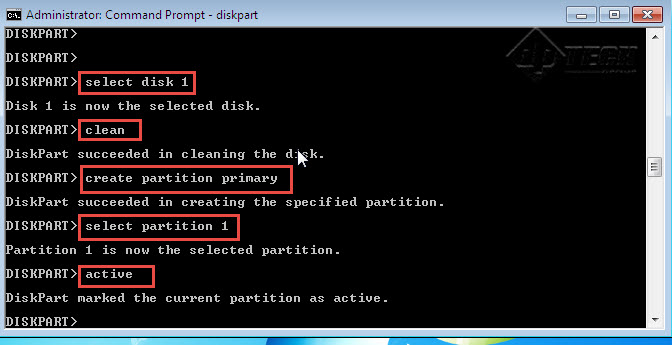
Step 4(b): Next, type in “select disk 1” command to enter the USB-Drive.
Step 5: In order to delete MBR (Master Boot Record) or GPT (GUID Partition Table), hidden sectors and volumes of drive, type in “clean” command.
Step 6: Next, create the primary partition in the USB Drive. You can do so by typing in “create partition primary” command.
Step 7: Type command “select partition 1”.
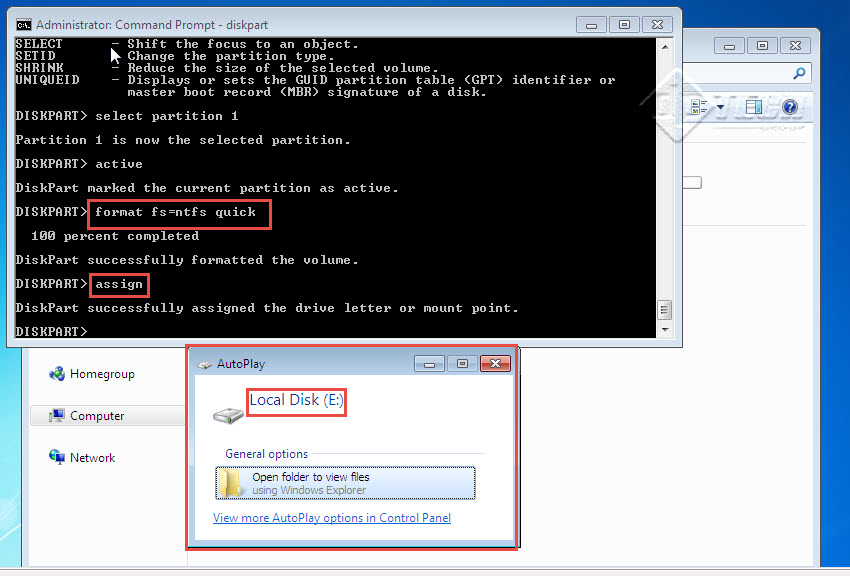
Step 8: To make the partition active, type in “active” command. (Check the screenshot below)
Step 9: Next, you have to format the USB Drive in NTFS volume by typing “format fs=ntfs quick” command. If you get an error, chances are that you’ve typed the wrong command. Check and type in the correct syntax again.
Step 10: Formatting will take some time to complete, especially if the USB drive at hand is several GBs in size. Be patient.
Step 11: In order to assign drive letter or to mount the USB Drive, type in “assign” command.
Step 12: To exit from the diskpart utility, type in “exit” command. Your USB-Flash Drive is now ready to be made bootable. (Check the screenshot below)
Step 13: You can now make the USB drive bootable by copying the Operating System files into the USB Drive.
Step 14: Insert the Windows 7 (or any other operating system for that matter) DVD into the DVD-ROM.
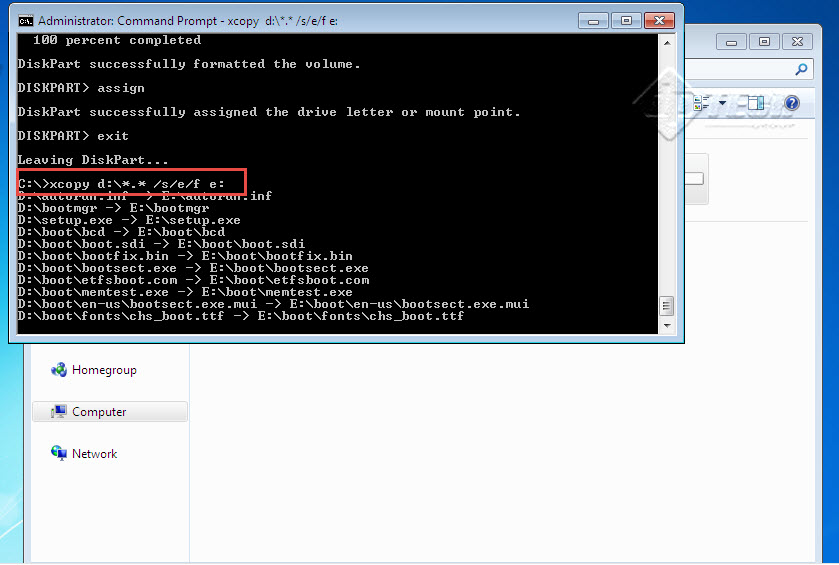
Step 15: It is important to note here that D-Drive is our DVD-ROM and E-Drive is USB Drive.
Step 16: Type in “xcopy D:\*.* /s/e/f E:” command to copy all Windows 7 files into USB-Drive (E: ). (Check the screenshot below)
Note: Make sure to type in the command correctly. Many people trying to make a bootable USB drive are stuck with command errors simply because they do not type commands correctly.
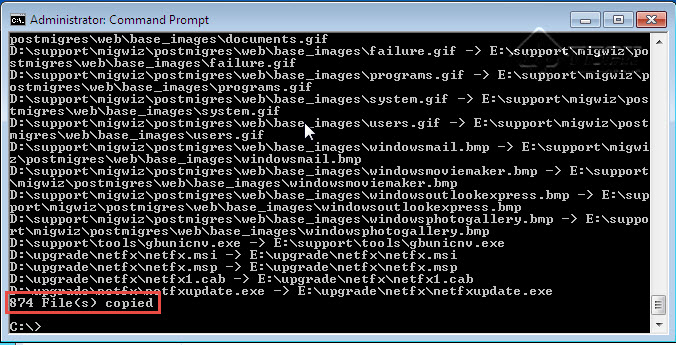
Step 17: The screenshot below displays all files of the Windows 7 Operating System that have been copied to the USB Drive.
Note: This method is employed to make a bootable USB Drive. This bootable device can now be used to install Windows 7 Operating System on a computer. But keep in mind that, you will have to first change the BIOS settings and make USB-Device your computer’s 1st Boot Device and Hard Disk as 2nd Boot Device.
[Read: How to Change Boot Device Priority by Changing BIOS Settings of Your Motherboard]


